Below are the steps that allowed us to set up DHCP, TFTP on a VM host and boot other hosts in the same network using PXE.
Set up network adaptors in VMWare instance.
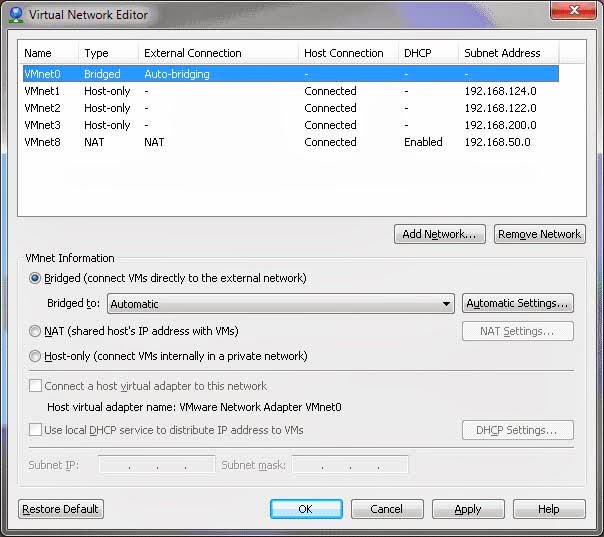
Set up a bridging machine with 2 network adaptors

Set up a future DHCP/PXE server machine with host-only network

Install OS - (in our case Linux Ubuntu 11.04)
from distribution ubuntu-11.04-alternate-i386.iso on both machines
You can pick it up at http://old-releases.ubuntu.com/releases/natty/
When Prompted set up IPs as follows
- Bridging machine (hobr) 192.168.124.25
- DHCP/TFTP/PXE server (hoonly) 192.168.124.11
Login to the Bridging Machine
Execute
sudo sysctl -w net.ipv4.ip_forward=1
sudo iptables -t nat -A POSTROUTING -o eth0 -j MASQUERADE
Login to the DHCP/PXE server machine
Execute
sudo route add defaut gw 192.168.124.25 eth0
sudo route delete default gw 192.168.124.1
NOTE – deleting the old gateway is needed for the correct routing.
sudo vi /etc/resolv.conf
Modify or enter nameserver as follows (for my case – my router’s IP):
nameserver 192.168.1.1
sudo
/etc/init.d/networking restart
Now we need
to install some convenience software.
1. update apt-get
information
$ sudo apt-get update2. install open-ssh
$ sudo apt-get install openssh-server openssh-client
Now you
should be able to connect using PUTTY
Install and Configure DHCP Server
Install dhcp
$ sudo apt-get install dhcp3-server
Configure
DHCP
$ sudo vi
/etc/dhcp/dhcpd.conf
-----------------------------------------------
allow booting;allow bootp;
subnet 192.168.124.0 netmask 255.255.255.0 {
range 192.168.124.100 192.168.124.250;
option broadcast-address 192.168.124.255;
option routers 192.168.1.1;
option domain-name-servers 192.168.1.1;
filename "pxelinux.0";
}
------------------------------------------------
Start DHCP
$ sudo /etc/init.d/networking restart
Reboot the host ------- was needed !!! in my case.
Otherwise server is running but does not allocate IPs.
Running server shows
$ ps auxwww | grep dhcpddhcpd 1043 0.0 0.1 4492 1944 ? Ss
Now any new node on 192.168.124.* subnet (host-only) will be assigned an IP starting from 192.168.124.100. You can create a VM with host-only interface connected to 192.168.124.* subnet and power it up. The message will look like below.

Install and Configure TFTP server
Create a
directory where files will reside.
$ sudo mkdir /tftpboot$ sudo chmod 777 /tftpboot
$ sudo chown nobody:nogroup /tftpboot
The TFTP
server WILL NOT START otherwise
Install
TFTP server
$ sudo apt-get install tftp-hpa tftpd-hpa
Configure
TFTP server
$ sudo vi /etc/default/tftpd-hpa
Set up the
file contents as follows
___________________________# /etc/default/tftpd-hpa
RUN_DAEMON="yes"
OPTIONS="-l -c -s /tftpboot/"
TFTP_USERNAME="tftp"
TFTP_DIRECTORY="/tftpboot/"
TFTP_ADDRESS="0.0.0.0:69"
TFTP_OPTIONS="--secure"
___________________________
The server
is EXTREMELY picky, it does not start with other settings and does not give any
error messages. Make sure that TFTP directory (/tftpboot in our case) exists.
Start TFTP
server
$
sudo service tftpd-hpa starttftpd-hpa start/running, process 2273
To verify
that the server is listening do the following
$
sudo netstat -aunp | grep ":69 "udp 0 0 0.0.0.0:69 0.0.0.0:* 2246/in.tftpd
Setup OS to Install Through PXE (try
Debian)
Create
directory
$ mkdir -p /tftpboot/debian/etch/i386$ chmod 777 -R /tftpboot/debian
Get the
files with OS image, etc to be installed.
$
cd /tftpboot$ wget http://archive.debian.org/debian/dists/etch/main/installer-i386/current/images/netboot/gtk/debian-installer/i386/pxelinux.0
$ cd /tftpboot/debian/etch/i386
Configure
boot for the system
$ mkdir -p /tftpboot/pxelinux.cfg$ chmod 777 /tftpboot/pxelinux.cfg
$ sudo vi /tftpboot/pxelinux.cfg/default
The
contents of the default file should be as follows
_________________DEFAULT linux
LABEL linux
kernel debian/etch/i386/linux
append vga=normal initrd=debian/etch/i386/initrd.gz –
__________________
Power up your host-only VM that connects to 192.168.124.*
You will see the OS install screens.
