Saturday, September 21, 2013

Setting Up DHCP and TFTP in Linux Ubuntu 11.04 running on VMs

We created  our test hosts using VMware running on a Windows 7 machine.

Below are the steps that allowed us to set up DHCP, TFTP on a VM host and boot other hosts in the same network using PXE.

Set up network adaptors in VMWare instance.
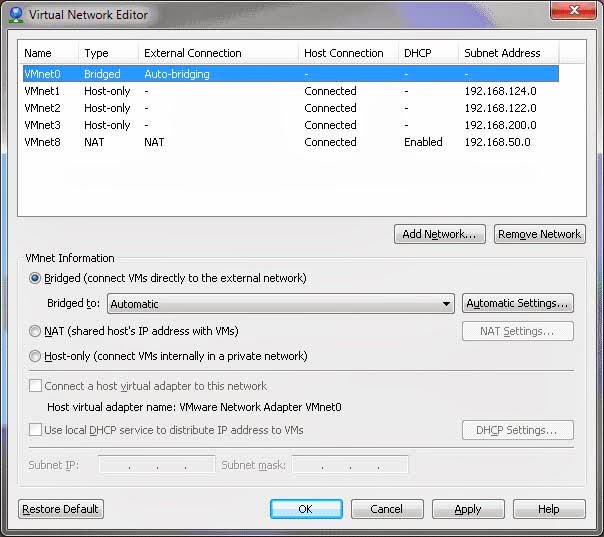


Set up a bridging machine with 2 network adaptors


Set up a future DHCP/PXE server machine with host-only network


Install OS - (in our case Linux Ubuntu 11.04)

   from distribution ubuntu-11.04-alternate-i386.iso on both machines

   You can pick it up at http://old-releases.ubuntu.com/releases/natty/
   When Prompted set up IPs as follows
    -         Bridging machine (hobr)                  192.168.124.25
    -         DHCP/TFTP/PXE server (hoonly)             192.168.124.11


Login to the Bridging Machine
Execute
sudo sysctl -w net.ipv4.ip_forward=1
sudo iptables -t nat -A POSTROUTING -o eth0 -j MASQUERADE


Login to the DHCP/PXE server machine
Execute
sudo route add defaut gw 192.168.124.25 eth0
sudo route delete default gw 192.168.124.1

NOTE – deleting the old gateway is needed for the correct routing.

sudo vi /etc/resolv.conf

Modify or enter nameserver as follows (for my case – my router’s IP):
nameserver  192.168.1.1

sudo /etc/init.d/networking restart


Now we need to install some convenience software.

1. update apt-get information
$ sudo apt-get update

2. install open-ssh
$ sudo apt-get install openssh-server openssh-client

Now you should be able to connect using PUTTY


Install and Configure DHCP Server


Install dhcp
$ sudo  apt-get install dhcp3-server


Configure DHCP
$ sudo vi  /etc/dhcp/dhcpd.conf

-----------------------------------------------
allow booting;
allow bootp;

subnet 192.168.124.0 netmask 255.255.255.0 {
  range 192.168.124.100 192.168.124.250;
  option broadcast-address 192.168.124.255;
  option routers 192.168.1.1;
  option domain-name-servers 192.168.1.1;
  filename "pxelinux.0";
}
------------------------------------------------

Start DHCP
$ sudo /etc/init.d/networking restart


Reboot the host ------- was needed !!!  in my case.  Otherwise server is running but does not allocate IPs.


Running server shows
$  ps auxwww | grep dhcpd

dhcpd     1043  0.0  0.1   4492  1944 ?        Ss   15:47   0:00 /usr/sbin/dhcpd -q -pf /var/run/dhcp-server/dhcpd.pid -cf /etc/dhcp/dhcpd.conf

Now any new node on 192.168.124.* subnet (host-only) will be assigned an IP starting from 192.168.124.100. You can create a VM with host-only interface connected to 192.168.124.*  subnet and power it up. The message will look like below.


Install and Configure TFTP server


Create a directory where files will reside.
$ sudo mkdir /tftpboot
$ sudo chmod 777 /tftpboot
$ sudo chown nobody:nogroup /tftpboot


The TFTP server WILL NOT START otherwise


Install TFTP server
$ sudo apt-get install tftp-hpa tftpd-hpa


Configure TFTP server
$ sudo vi /etc/default/tftpd-hpa


Set up the file contents as follows
___________________________
# /etc/default/tftpd-hpa
RUN_DAEMON="yes"
OPTIONS="-l -c -s /tftpboot/"
TFTP_USERNAME="tftp"
TFTP_DIRECTORY="/tftpboot/"
TFTP_ADDRESS="0.0.0.0:69"
TFTP_OPTIONS="--secure"
___________________________

The server is EXTREMELY picky, it does not start with other settings and does not give any error messages. Make sure that TFTP directory (/tftpboot in our case)  exists.


Start TFTP server
$ sudo service tftpd-hpa start
tftpd-hpa start/running, process 2273


To verify that the server is listening do the following
$ sudo netstat -aunp | grep ":69 "
udp        0      0 0.0.0.0:69              0.0.0.0:*                           2246/in.tftpd


Setup OS to Install Through PXE (try Debian)


Create directory
$ mkdir -p /tftpboot/debian/etch/i386
$ chmod 777 -R /tftpboot/debian

Get the files with OS image, etc to be installed.
$ cd /tftpboot

$ wget http://archive.debian.org/debian/dists/etch/main/installer-i386/current/images/netboot/gtk/debian-installer/i386/pxelinux.0

$ cd /tftpboot/debian/etch/i386


Configure boot for the system
$ mkdir -p /tftpboot/pxelinux.cfg
$ chmod 777 /tftpboot/pxelinux.cfg
$ sudo vi /tftpboot/pxelinux.cfg/default


The contents of the default file should be as follows
_________________
DEFAULT linux
LABEL linux
kernel debian/etch/i386/linux
append vga=normal initrd=debian/etch/i386/initrd.gz –
__________________

Power up your host-only VM that connects to 192.168.124.*
You will see the OS install screens.


Thursday, September 12, 2013

Host-Only Network External Connectivity

There are cases when we need to allow machines in a host-only network (created in VMware, for example) to connect to the Internet.

It can be achieved by creating a bridging machine that has 2 interfaces. One in the host-only network, the other one in the network we need to connect to.
The following is a sample set up (using VMware)for a case when our host-only network uses 192.168.124.* subnet.
1. Set up network adapters as follows
NameTypeExternal ConnectionHost ConnectionDHCPSubnet Address
VMnet0BridgedAuto-bridging---
VMnet1Host-only-Connected-192.168.124.0


2. Set up a bridging machine with 2 adapters - Bridged and Custom(VMnet1)

3. Set up machines in the host-only network with 1 adapter in the host-only network

4. Install OS - Linux Ubuntu 11.04 in our tests (from distribution ubuntu-11.04-alternate-i386.iso You can pick it up at http://old-releases.ubuntu.com/releases/natty/)
When prompted by OS installer, set up the first IP for the Bridging machine as 192.168.124.25 - for example. We assume that the IP in the external network will be provided by a DHCP server.

5. Login to the Bridging Machine
Execute

sudo sysctl -w net.ipv4.ip_forward=1
sudo iptables -t nat -A POSTROUTING -o eth0 -j MASQUERADE

6. Login to host-only machines.
Execute

sudo route add defaut gw 192.168.124.25 eth0
sudo route delete default gw 192.168.124.1
NOTE – deleting the gateway created by default is needed for the correct routing.
sudo vi /etc/resolv.conf
Modify or enter nameserver as follows (in my case – my router’s IP): nameserver 192.168.1.1

7. Restart network

sudo /etc/init.d/networking restart 
Your host only machines should see the external network.


Monday, August 26, 2013

Using Expect in RH Linux - example

Sometimes you need to deliver a file to a set of remote hosts. After the file is delivered you might need to execute a script on the remote host.
Below is a simple example of how to use expect for that.
First create some directories under the directory where you will be testing the script
you will need to create
./config - to hold a file containing the list of remote hosts
./data - the file that you are going to upload goes there
./logs - access logs will be written there
Now create a list of hosts in ./config directory (I called mine target_list) Put actual remote hostnames here
echo host1.mydomain.net:/tmp > ./config/target_list
echo host2.mydomain.net:/var/tmp >> ./config/target_list

The script will also parse target directory for each host - directory comes after the host name delimited with :. (Note, that I am not using these directories in this example)

Create your package file in ./data
I populated my package with the commands below
echo hello > test.log
cat test.log

And now the script itself (run it as ./test package_file target_list )

You will be prompted to enter your username and password for your remote hosts access. You need to enter this information only once. Ignore all other prompts.
Your package file will be delivered to /tmp directory on your remote hosts
#!/usr/bin/expect -f


set packagename       [lrange $argv 0 0]
set targets_list_file [lrange $argv 1 1]

set dir_config ./config
set dir_data   ./data
set dir_log    ./logs
set dir_target /tmp

set myname $argv0
set timeout 20
log_file -noappend -a ${dir_log}/${packagename}_access_log


set prompt "(#|%|\\\]|\\\$|>).*"

##
## If script started without parameters, prompt for correct usage
##
proc usage {myname} {
   send_error "\nIncorrect usage !\n"
   send_error "\nShould run as following :\n"
   send_error "\n  $myname \[Package\] \[hosts\]\n"
   send_error "\n Exiting ...\n"
   send_error "\n"
}

##
## Get username
##
proc getuser {} {
   set timeout -1
   send_user "Login : "
   expect_user -re "(.*)\n"
   send_user "\n"
   set timteout 10
   return $expect_out(1,string)
}

##
## Get password
##
proc getpassword {} {
   set timeout -1
   stty -echo
   send_user "Password : "
   expect_user -re "(.*)\n"
   send_user "\n"
   stty echo
   set timeout 20
   return $expect_out(1,string)
}


##
## If started with correct parameters, run script
##
if { $argc == 2 } {
   puts "Connecting to target hosts and running scripts ..."
   set targets_list [open ${dir_config}/${targets_list_file}] 
   
} else {
   usage $myname ; exit 1
}

##
## Get user and password
##
set user [ getuser ]      
expect *
set password [ getpassword ]
expect *

##
## Loop through the target hosts
##
while { [gets ${targets_list} input] != -1 } {

    set host [lrange [split $input ":"] 0 0]
    set targetdir [lrange [split $input ":"] 1 1]


###
### copy package using scp
###
spawn scp ${dir_data}/${packagename} $user@$host:${dir_target}
match_max 100000

expect {
       -re ".*Are.*.*yes.*no.*" {
       send "yes\r"
       exp_continue
       }

       #
       #look for the password prompt
       #
       "?assword:" {
       send -- "$password\r"
       exec sleep 2
       }
       default {
       continue
       }
}

expect {
         -re   "$prompt"  { 
             send "hostname\r" 
          }
         "?assword:" { 
             send_user "\n\nIncorrect login or password !\n\n\r" ; exit 1 
          }
         default { 
             send_user "\n\nLogin time out !\n\n\r" ; continue 
         }
}
###
### End copy package
###


###
### ssh into remote host 
###

spawn ssh $user@$host
match_max 100000

expect {
       -re ".*Are.*.*yes.*no.*" {
       send "yes\r"
       exp_continue
       #look for the password prompt
       }

       "?assword:" {
           send -- "$password\r"
           exec sleep 2
       }
       default {
           continue
       }
}
expect { 
       -re "$prompt"  { 
           send "hostname\r" 
       }
       "?assword:" { 
           send_user "\n\nIncorrect login or password !\n\n\r" ; exit 1 
       }
       default { 
           send_user "\n\nLogin time out !\n\n\r" ; continue 
       }
}


##
## Give full permissions to the copied file 
##  (\r needed in the end of each command)
##
expect -re "$prompt"
send "chmod 777 ${dir_target}/${packagename}\r"

##
## cd into target directory - ${dir_target} - set as /tmp in this script
##
expect -re "$prompt"
send "cd ${dir_target}\r"

##
## check if the package was delivered to the target directory
##
expect -re "$prompt"
send "ls -lrt ${dir_target}/${packagename}\r"

##
## run the package script
##
expect -re "$prompt"
send "${dir_target}/${packagename} \r"

}
##
## End of loop through hosts
##

###
### exit, close target list file
###
expect -re "$prompt"
send "exit\r"

expect eof

close $targets_list

puts "\n"